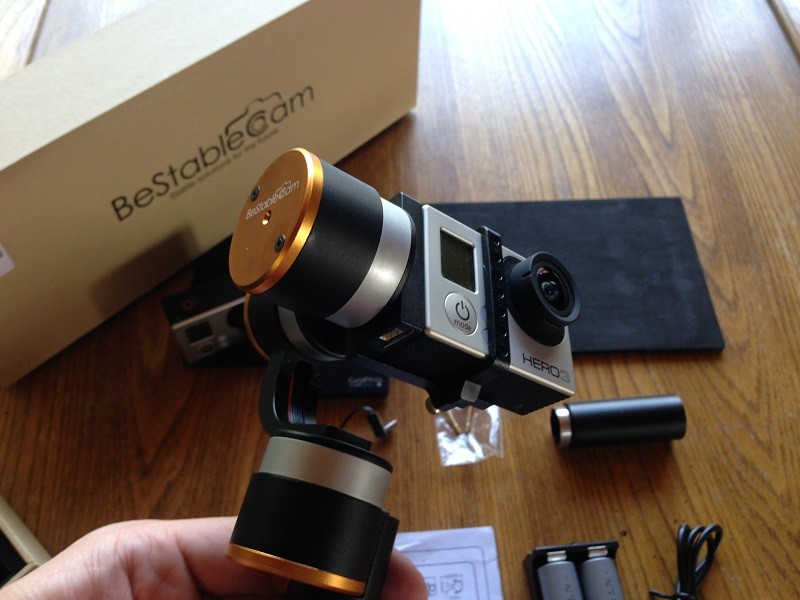
So lately I’ve been getting into some aerial cinematography using quadcopters and I learned a little bit about gimbals in the process (unintentionally). I make some YouTube product reviews in other markets so I figured this would be a good time to invest in a 3 Axis gimbal for my GoPro Hero 3.
I wanted to be able to create smooth panning shots and also use it for some of the other things like hiking, snowboarding and eventually mount it to the helmet of my dirt bike.
This will be a short review of the BeStableCam SteadyGim3 EVO 3 Axis GoPro Stabilizer but before we get into that I should tell you that I bought the Feiyu G3 Ultra 3-Axis Handheld Gimbal before this one and seemed to be broken out of the box.
After some quick google searches, I was able to find quite a few comments about the twitching/shaking motion that my unit was doing.
So after returning that unit and talking with the Amazon store owner, he recommended picking up the BeStableCam SteayGim 3 Evo because of the “longer battery life and much stronger motors”.
I took him up on the advice and so far so good. Definitely a much stronger unit with much better features. I also had to pay another $80 bringing the total for the SteadyGim 3 Evo to ~$335 so hopefully the upgrades are worth the extra cash. You can pick one up here from the same place I got mine.
In the Box:
They pretty much thought of everything that you would need and you are completely ready to start using the unit straight out of the box. Although I do recommend that you fully charge both batteries before use.
Features:
The features of this unit are pretty good and big improvement over the Feiyu G3.
First, off this unit has the ability to manually change pitch angle and roll angel of the gimbal via buttons. The up button will pan up or roll right. The down button will pan down or roll left. The middle button controls the gimbal modes which I talk about a little further down.
Next feature that I really like about this unit is that the batteries can be charged via the included USB 18650 charging adapter or they can remain in the device and charge via the Micro USB slot on the device itself.
The SteadyGim3 Evo can also charge your GoPro via the included charging cable. I haven’t tested battery life when using this feature nor have I tested how long it would take to charge the GoPro using the device. I will do some testing and report back with the numbers soon.
Gimbal Modes/Options:
The SteadyGIM 3 comes with 3 different modes.
1. The first of three and the default mode is the “Heading Follow Mode” (up down buttons adjust pitch angle):
Definition: Roll axis maintains a flat horizon and the camera smoothly moves in the same direction that the gimbal handle is aimed. When the handle is rotated to the left, the camera slowly moves to the left until pointing in the same direction as the front of the gimbal.
Use: Used to pan or track a moving subject.
2. Pressing the mode button twice will bring you to the “Heading and Pitch Follow Mode” (up down buttons adjust roll angle):
Definition: Same as “Heading Follow” but both the Yaw (Heading) axis and Pitch axis follow in the direction the gimbal handle is pointing.
Use: For higher or lower than eye height filming. I.E. If you were standing over a cliff and wanted to have it pan down as you went out over it.
3. Last, pressing the mode button one time will bring you to “Heading Lock Mode”:
Definition: Camera locks on to a compass heading regardless of the movement of the gimbal handle. The horizon remains flat and stable.
Use: Mounting to a bike or using for selfies.
Operation:
The power button is located at the bottom of the unit. The power button puts the device in standby mode so you can still turn the unit on or off if you have extensions. Hold down the “Mode Button” for 3 seconds to turn on the device.
With the Feiyu G3, you have to unscrew the extensions in order to get to the power button to turn off the unit. So it’s really nice to be able to control everything via the mode button on the stick itself.
I needed to calibrate mine when I received it and here are the BeStableCam SteadyGIM 3 EVO calibration instructions:
Calibration:
1) Turn on the gimbal by pressing the on/off button on the bottom of the handle.
2) Quickly place the handle on a stable hard surface and keep still. The battery indication light will start to blink four times repeatedly.
3) Before turning on the stabilization using the mode button hold the up button for 1 second. Watch the amber mode light on the back of the roll motor. The light will now blink three times repeatedly.
4) Press the down button and hold for 1 second. The amber mode light on the back of the roll motor will now turn off.
5) Initialization is now complete.
6) Press and hold the mode button until the gimbal comes to life. Gimbal is now ready to use.
Charging Times & Battery Life:
As you can see above the SteadyGIM 3 EVO uses 18650 3.7v 2000mAh batteries. I haven’t actually used them until they die yet and I’ve used it for hours at a time. The website says they will work for 7-12 hours depending on your configuration.
The batteries take about three hours to fully charge. Battery levels are indicated by a blue blinking LED just to the right of the mode button.
4 Flashes = 100% Charge
3 Flashes = 75% Charge
2 Flashes = 50% Charge
1 Flash = 25% Charge
Accessories/Extensions:
I ended up buying the Feiyutech G3 Ultra Reach Carbon Fiber Extention Pole x 2 when I bought the FY G3. I ended up keeping these and they work with the SteadyGIM 3 EVO. The switch doesn’t quite screw in all the way but it does form a tight lock and functions just fine as a power button. No modifications at all to make these work. You can pick up the extensions for round $30.
Summary:
Another video I made with SteadyGim3 EVO 3 Axis Gimbal:
No problems with the gimbal after the crash. No case and on the GoPro and it was fine as well.